
Making rice noodles for pho demands precise rice selection and careful batter preparation, with long-grain varieties containing 22-28% amylose providing the ideal texture balance. I blend soaked rice with tapioca starch for elasticity, steam thin sheets until translucent, then cut them into 3-6mm wide strands for authentic bánh phở.
Key Takeaways
- Rice selection is critical – I use long-grain jasmine or white rice with 22-28% amylose content for proper firmness and texture retention in hot broth.
- Proper batter preparation – I soak rice overnight, blend with tapioca starch and salt, then rest for 6-24 hours to develop flavor and improve texture.
- Essential equipment needed – I require a high-powered blender for smooth batter, consistent steamer maintaining 212°F, non-stick surfaces, and sharp cutting tools.
- Steam timing matters – I cook thin batter layers for 60-90 seconds until completely translucent, maintaining steady heat and humidity throughout.
- Fresh storage is limited – I use immediately for best results or refrigerate cut noodles for maximum 2 days, refreshing with 10-15 second blanching if needed.
Understanding Pho Noodles: The Role of Rice in Texture
Creating authentic rice vermicelli for pho starts with understanding how rice chemistry affects the final noodle texture. I’ve discovered that bánh phở requires specific rice varieties to achieve that perfect balance of firmness and tenderness that defines great pho.
The Science Behind Rice Selection
Authentic pho noodles demand rice with a precise starch profile, specifically long-grain varieties containing 22–28% amylose. This particular amylose content creates the ideal structure that allows bánh phở to maintain firmness when submerged in steaming hot broth. Rice with lower amylose content produces noodles that become mushy too quickly, while higher levels result in overly rigid noodles that lack the characteristic soft chew.
I prefer using jasmine or long-grain white rice for making pho rice noodles at home. These varieties naturally contain the right amylose levels and produce noodles with excellent texture retention. The starch molecules form a network during the steaming process that gives bánh phở its distinctive ability to absorb flavors while maintaining structural integrity.
Fresh vs. Dried: Texture Differences That Matter
Fresh pho noodles (bánh phở tươi) deliver superior texture compared to their dried counterparts. I notice the difference immediately – fresh noodles offer a silky smoothness and satisfying chew that dried versions simply can’t match. When I make bánh phở tươi at home, the noodles have a translucent appearance and springy texture that elevates the entire pho experience.
Fresh rice noodles maintain better elasticity because they haven’t undergone the dehydration process that can damage the starch structure. This preservation of the original texture means fresh bánh phở responds better to the high-temperature broth, softening gradually rather than becoming waterlogged instantly.
The preparation method for rice vermicelli dishes influences the final texture significantly. I’ve found that fresh noodles require minimal cooking time – often just a quick blanch in boiling water – before being added to the broth. This brief preparation helps achieve the perfect texture balance that pho demands.
Temperature resistance becomes crucial when dealing with pho’s traditional serving method. Quality bánh phở must withstand broth temperatures around 200°F without breaking apart or becoming overly soft. I test my homemade noodles by adding them to very hot broth and observing how they hold up over several minutes. Properly made pho rice noodles should remain smooth and tender while retaining enough structure to be lifted with chopsticks.
The width and thickness of bánh phở also affect texture perception. I cut my fresh noodles to approximately ¼ inch width, which provides the optimal surface area for broth absorption while maintaining structural integrity. Thinner noodles tend to overcook quickly, while thicker ones may remain too firm in the center.
Texture quality in pho noodles can make or break the dish. I’ve learned that achieving the right consistency requires attention to rice selection, proper steaming techniques, and careful timing during preparation. Fresh bánh phở tươi consistently delivers the silky, tender texture that defines authentic Vietnamese pho, making the extra effort worthwhile for serious home cooks.
The amylose content in rice directly correlates with how well the finished noodles perform in hot broth. I recommend testing different rice varieties to find the one that produces the texture you prefer, keeping in mind that consistency comes from using the same rice type and preparation method each time you make pho rice noodles at home.
Preparing the Batter: Soaking, Blending, Resting
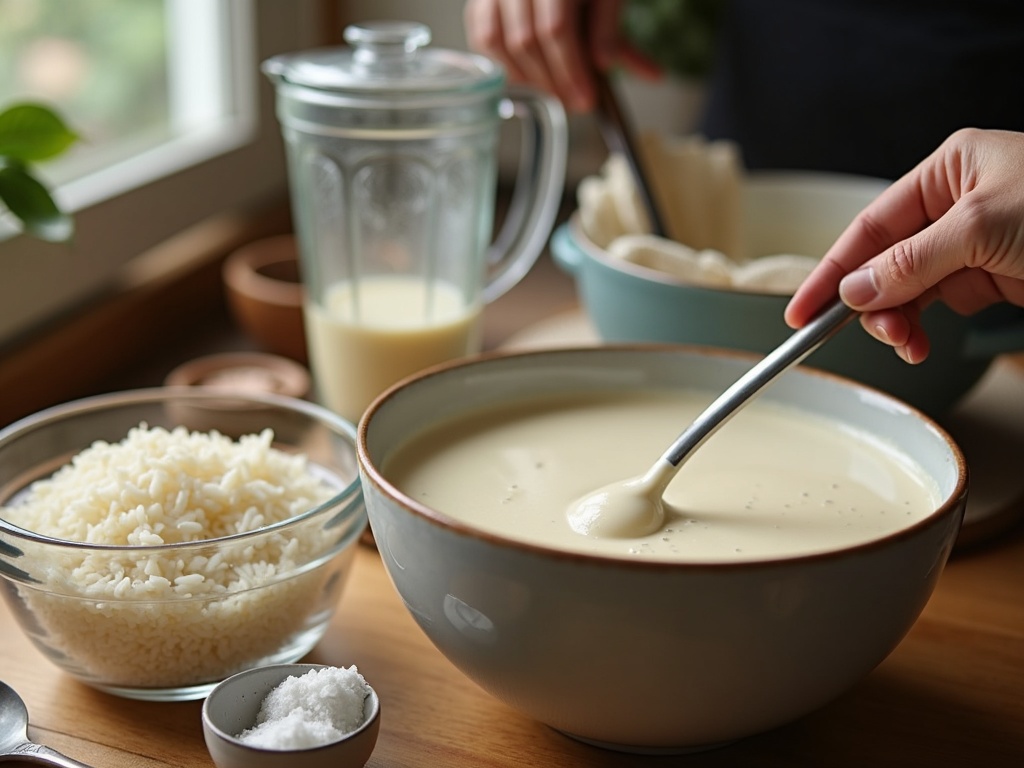
Creating authentic pho noodles starts with properly preparing the rice batter, a process that requires patience and attention to detail. I begin by soaking 400g of long-grain white rice in water overnight, allowing the grains to absorb moisture for 8–12 hours. This overnight soak softens the rice completely, making it easier to blend into a smooth consistency.
After draining the soaked rice, I add 500g of fresh water to create the base liquid. The next crucial step involves incorporating 40–60g of tapioca starch, which provides the elasticity that gives pho noodles their characteristic chewy texture. I also add half a teaspoon of salt, which enhances flavor and helps strengthen the noodle structure. The tapioca starch content can be adjusted based on your preference for noodle firmness.
Using a high-powered blender, I process the mixture until it becomes silky smooth. This blending stage is critical — any remaining rice particles will create uneven textures in the final noodles. I blend for several minutes, stopping occasionally to scrape down the sides and ensure complete incorporation of all ingredients. Rice vermicelli preparation follows similar principles, though the proportions differ slightly.
The Fermentation Process
Once blended, I allow the pho noodle batter to rest for 6–24 hours at room temperature. This resting period enables slight natural fermentation, which develops complex flavors and improves the noodle’s final texture. During fermentation, beneficial bacteria break down starches, creating subtle tangy notes that complement the rich pho broth.
The properly prepared rice slurry should coat a spoon thinly and evenly when lifted. If the batter appears too thick, I add small amounts of water until achieving the correct consistency. Conversely, if it’s too thin, I blend in additional rice flour or let it settle longer to concentrate.
Temperature control matters during the resting phase. I keep the batter covered with a damp cloth to prevent surface drying while allowing air circulation for fermentation. The longer resting time produces more complex flavors, but even six hours provides noticeable improvement over fresh batter.
Testing the batter’s readiness involves checking its flow characteristics. When poured from a ladle, it should stream smoothly without breaking into droplets. This consistency ensures even noodle thickness during the steaming process. Rice noodle dishes benefit from this careful preparation, as the improved texture enhances every recipe where these noodles are featured.
Tools You’ll Need to Make Bánh Phở at Home
Creating perfect bánh phở requires specific equipment that ensures smooth batter preparation and consistent steaming results. I recommend investing in quality tools that will deliver professional-grade noodles every time.
Essential Equipment for Perfect Rice Noodle Production
The foundation of excellent pho noodles starts with your blender. High-powered models like Vitamix or Blendtec create the silky-smooth batter consistency that’s crucial for thin, delicate noodles. Standard blenders often leave lumps that create uneven textures in your finished product.
Your steamer setup determines the quality of your final noodles. I use a steamer that maintains consistent 212°F heat with a flat, non-stick surface. This temperature consistency prevents the noodles from cooking too quickly or developing tough spots. The non-stick surface allows for easy removal without tearing the delicate sheets.
For handling and shaping your noodles, you’ll need these specific tools:
- Offset spatula for smoothly spreading batter across steaming surfaces
- Bench scraper for lifting and transferring noodle sheets without damage
- Oil brush for lightly coating steaming surfaces to prevent sticking
- Sharp knife and large cutting board for precise noodle cutting
Round 9-inch cake pans or glass plates serve as ideal steaming trays. These provide the perfect surface area for thin, even noodle sheets. Metal pans heat more evenly than plastic alternatives, while glass plates offer excellent visibility during the steaming process.
Traditional noodle makers often use steamer cloth, which creates an authentic texture and allows for easier handling of the finished sheets. This optional tool adds authenticity to your homemade process, though it’s not essential for beginners.
I’ve found that having multiple steaming trays speeds up production significantly. While one sheet steams, you can prepare the next batch on a second tray. This workflow keeps your noodle-making process efficient and maintains consistent results throughout your batch.
The key to success lies in temperature control and smooth batter preparation. Your equipment directly impacts both factors. Quality tools make the difference between restaurant-quality noodles and disappointing results that fall apart during cooking.
Before starting your first batch, ensure all surfaces are clean and lightly oiled. Test your steamer’s temperature with a thermometer to confirm it reaches and maintains 212°F. This preparation step prevents common issues like uneven cooking or sticking that plague many first-time noodle makers.
Understanding what rice vermicelli is made of helps you appreciate why specific equipment matters for achieving the right texture and consistency in your homemade bánh phở.
Steaming the Noodle Sheets to Perfection
The steaming process transforms your rice batter into silky, translucent sheets that will eventually become your rice noodles. I’ve perfected this technique through countless batches, and timing is everything when steaming rice noodles.
Essential Steam Technique for Professional Results
Start by heating your steamer pan for 15-20 seconds before adding any batter. This crucial step ensures even heat distribution and prevents the batter from sticking to a cold surface. I always test the pan’s readiness by sprinkling a few drops of water — they should sizzle immediately.
Pour approximately half a cup of your prepared rice batter into the heated pan. Quickly swirl the pan to coat the entire surface evenly, creating a thin layer that will cook uniformly. The swirling motion must be swift and confident to achieve consistent thickness across your pho noodle sheets.
Steam the batter for 60-90 seconds until the sheet becomes completely translucent and slightly puffed. I watch for specific visual cues during this phase — the raw, opaque white batter gradually transforms into a clear, glossy sheet through gelatinization. The edges will start to curl slightly, indicating the starches have properly set.
Remove each translucent noodle sheet gently using a spatula or your hands if the sheet has cooled enough. Immediately place it on a well-oiled surface to prevent sticking. I brush the top surface with a light coating of oil, which creates a non-stick surface and prevents the sheets from adhering to each other when stacked.
Allow each sheet to cool for 15-20 minutes before handling further. This cooling period lets the starches firm up completely, transforming the delicate steamed sheet into a workable noodle base. During this time, the texture stabilizes and becomes easier to cut without tearing.
The key to consistent results lies in maintaining steady heat throughout the steaming process. I keep my steamer at medium-high heat and never lift the lid unnecessarily, as this releases crucial steam pressure. Each sheet should have the same cooking time and temperature for uniform texture.
Monitor the thickness of your batter layer carefully:
- Too thick creates chewy, dense noodles
- Too thin results in fragile sheets that tear easily
I aim for a layer thin enough to see the pan bottom through the batter but thick enough to handle without breaking.
Temperature control becomes critical as you work through multiple batches. The pan may become hotter with each successive sheet, so I adjust my timing accordingly:
- First few sheets: 90 seconds
- Later sheets: 50-60 seconds
Proper oil application prevents frustrating sticking issues that can ruin hours of work. I use a pastry brush to apply neutral oil evenly across both the cooking surface and the finished sheet. This step-by-step approach ensures each noodle sheet releases cleanly and maintains its integrity.
Stack your cooled sheets carefully, alternating the direction if space allows. This prevents the sheets from melding together and makes cutting easier later. I often prepare 8-10 sheets at once, which provides enough rice noodles for family meals or larger gatherings.
The steaming environment should remain humid and hot throughout the process. I keep extra water boiling in the steamer base and never let the water level drop too low. Consistent steam pressure ensures even cooking and prevents the sheets from developing tough spots or uneven texture.
Practice makes perfect with this rice noodle step by step process. Your first few attempts might not achieve restaurant-quality results, but each batch teaches valuable lessons about timing, heat control, and batter consistency. I’ve found that mastering the steaming technique is the foundation for exceptional homemade pho noodles.

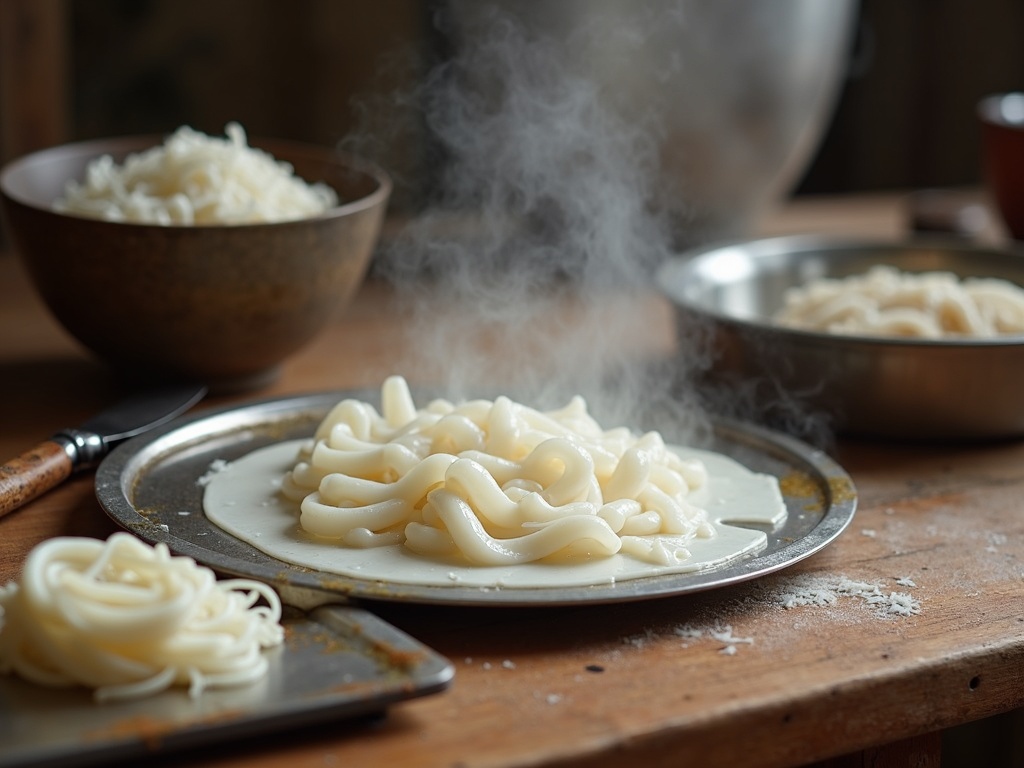
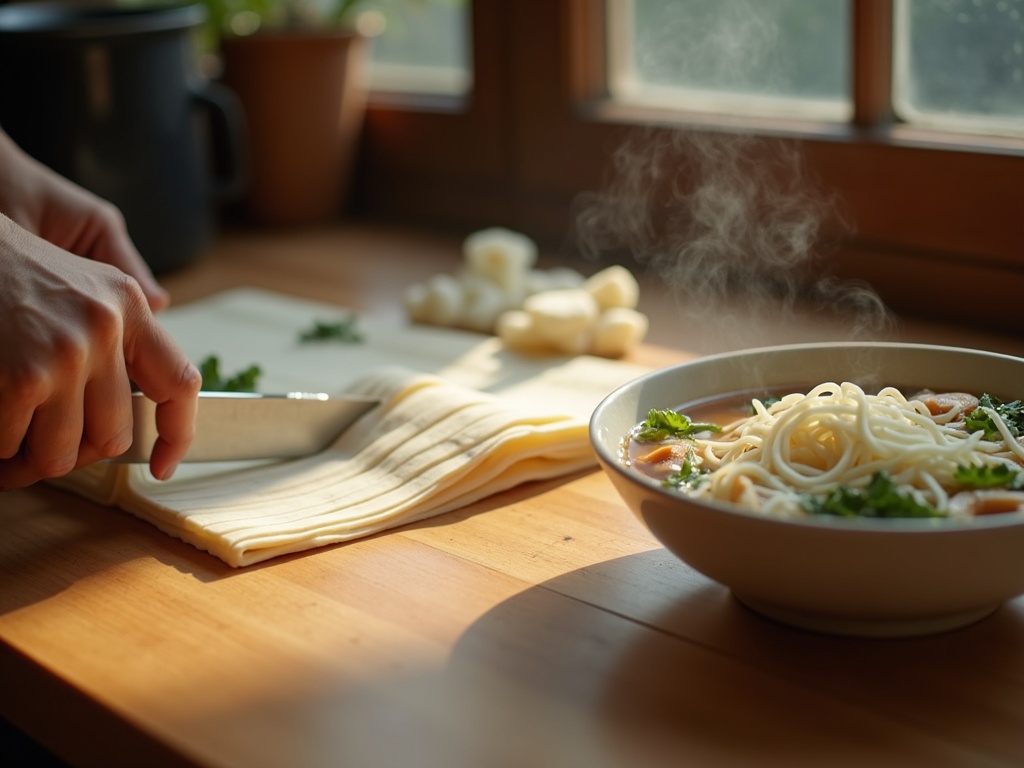
Cutting and Storing Fresh Pho Noodles
I transform cooled rice sheets into perfect rice vermicelli strands through a careful cutting process. First, I stack 3–4 cooled sheets together and fold them into neat quarters. This technique creates multiple layers that allow me to cut several noodles simultaneously while maintaining consistent thickness.
Achieving the Perfect Noodle Width
I slice crosswise through the folded sheets to create bánh phở noodles that measure 3–6mm wide, roughly 1/8 to 1/4 inch. Sharp kitchen shears or a very sharp knife work best for this task. The key lies in making swift, decisive cuts to prevent the rice sheets from tearing or sticking together. I find that slightly wider noodles around 6mm hold up better in hot broth, while thinner 3mm strands offer a more delicate texture.
When I cut pho noodles, I work quickly to prevent the sheets from drying out. Each cut should be clean and straight, creating uniform strands that cook evenly. I gently separate the noodles after cutting to ensure they don’t clump together.
Storage and Refreshing Techniques
Fresh bánh phở can be used immediately after cutting, which provides the best texture and flavor. However, I often prepare larger batches and store them for later use. I place the cut noodles in an airtight container and refrigerate them for up to 2 days. Beyond this timeframe, the noodles begin to lose their optimal texture and may develop an off flavor.
When I need to refresh stored noodles, I blanch them briefly for 10–15 seconds in rapidly boiling water. This process revives their texture and removes any refrigerator odors. I drain them immediately and use them right away for the best results.
For serving, I place the fresh or refreshed noodles directly into bowls and pour the hot pho broth over them. The heat from the broth cooks the noodles to the perfect doneness. This method ensures the noodles maintain their ideal texture — tender yet with a slight bite — that distinguishes authentic rice vermicelli for family meals.
I never recommend freezing fresh rice noodles, as this destroys their delicate texture. Instead, I prepare only what I need or plan to use within the two-day refrigeration window. Proper storage involves:
- Laying the noodles in a single layer or loosely coiling them to prevent sticking
- Dusting lightly with rice flour if they feel sticky (though well-made noodles shouldn’t require this)
The blanching process serves multiple purposes beyond refreshing day-old noodles. It also helps when I want to slightly soften very fresh noodles or when I’m preparing large quantities for a crowd. I keep the blanching time minimal — just long enough for the water to return to a boil after adding the noodles. Longer cooking times result in mushy noodles that break apart in the broth.
Sources:
Understanding Pho Noodles: The Role of Rice in Texture
Preparing the Batter: Soaking, Blending, Resting
Tools You’ll Need to Make Bánh Phở at Home
Steaming the Noodle Sheets to Perfection
Cutting and Storing Fresh Pho Noodles