
Mastering spring roll assembly demands precise technique, proper ingredient preparation, and an organized workspace that functions like an assembly line. Professional-quality results come from understanding wrapper hydration timing, maintaining proper filling ratios, and executing the rolling sequence with consistent tension throughout the process.
Key Takeaways
- Set up an organized rolling station with warm water (90-100°F), a non-porous surface, and ingredients arranged within easy reach for smooth workflow
- Hydrate rice paper wrappers for exactly 15-20 seconds in warm water, removing them while still slightly firm to prevent tearing
- Position filling correctly 2 inches from the bottom edge with 1-1.5 inch side borders, using a 2:1:1 ratio of vegetables to protein to noodles
- Execute the rolling sequence by tucking the bottom edge tightly under filling, folding sides inward, then rolling forward with gentle, consistent pressure
- Prepare all ingredients at room temperature with proteins pre-cooked and cooled, vegetables thoroughly dried, and noodles properly drained to prevent wrapper damage
Spring Roll Workflow
Spring roll perfection starts with strategic workspace setup. I arrange all components within arm’s reach before touching the first wrapper. Temperature control matters — warm water at 90-100°F activates the rice paper without making it too pliable too quickly.
Hydrating the Wrapper
Rice paper requires careful timing. I submerge each wrapper for 15-20 seconds exactly, then transfer it to my work surface while it retains slight firmness. Overhydration creates tears that ruin the entire roll. The wrapper continues softening on the counter, reaching perfect pliability just as I finish filling placement.
Filling Placement Ratios
Filling distribution follows a specific formula. I place ingredients 2 inches from the bottom edge, leaving 1-1.5 inches on each side. The 2:1:1 ratio of vegetables to protein to noodles creates balanced flavor and prevents overstuffing. Excess filling makes rolling impossible and creates messy, burst wrappers.
Executing the Roll
My rolling technique uses controlled tension. I fold the bottom edge over the filling, ensuring tight contact. Side edges fold inward next, creating neat borders. The final roll moves forward with gentle, consistent pressure — too loose creates sloppy rolls, while excessive force tears the delicate wrapper.
Preparations for Wrapping
Ingredient preparation sets the foundation for success. I cook proteins completely and cool them to room temperature before assembly. Vegetables get thorough drying after washing to remove surface moisture. Noodles drain completely in a colander, preventing soggy wrappers that stick to my work surface.
Layering Ingredients Strategically
Fresh herbs like cilantro and mint should go directly against the rice paper for visual appeal through the translucent wrapper. I layer sturdy vegetables like carrots and cucumbers next, followed by proteins and noodles in the center. This arrangement protects delicate herbs while maintaining structural integrity.
Storage Techniques
Storage requires immediate attention after rolling. I cover finished spring rolls with damp paper towels to prevent the wrappers from drying out and cracking. Plastic wrap creates condensation that makes wrappers sticky and difficult to separate later.
Final Thoughts
Quality spring rolls demand patience and practice. Each component affects the final result, from water temperature to rolling pressure. Consistency comes through repetition, developing muscle memory for proper wrapper handling and filling placement. Professional-level results emerge when technique becomes second nature, allowing creativity with flavor combinations while maintaining structural perfection.
The Art of the Perfect Spring Roll: A Step-by-Step Guide
I arrange my rolling station like an assembly line for maximum efficiency, working left to right to create a smooth workflow. This organized approach transforms what could be a messy process into a streamlined operation that produces consistently beautiful results.
Essential station setup begins with gathering four key components:
- A shallow dish filled with warm water heated to 90–100°F
- A non-porous rolling surface such as a cutting board or damp kitchen towel
- Organized ingredients within easy reach
- A plate designated for finished rolls
This systematic arrangement prevents fumbling and keeps the process moving smoothly.
Mastering the Rolling Technique
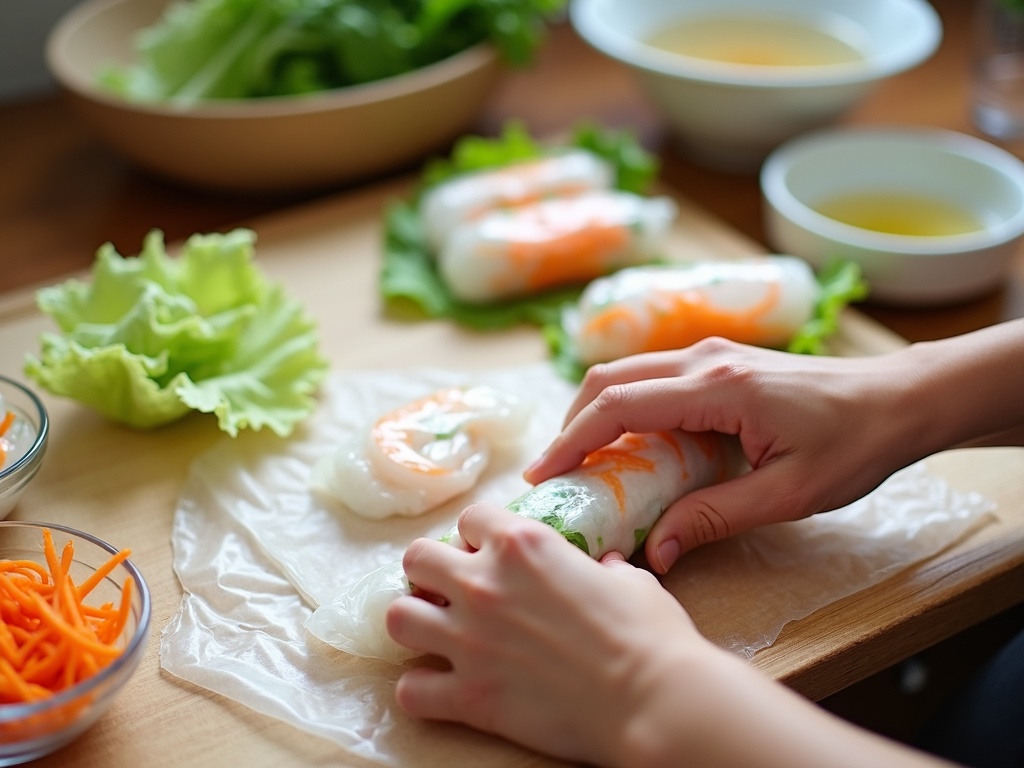
I hydrate one rice paper wrapper for exactly 15–20 seconds in the warm water—timing is crucial here. The wrapper should still feel slightly firm when removed, as it continues softening while you work. Over-soaking leads to tears and frustration.
Positioning the filling correctly makes all the difference. I place ingredients 2 inches from the bottom edge, maintaining 1–1.5 inch borders on both sides. This spacing prevents overstuffing and ensures clean edges.
The rolling process follows a specific sequence that creates tight, professional-looking results:
- Tuck the bottom edge tightly under the filling, creating tension
- Fold both sides inward like wrapping a burrito
- Continue rolling forward with gentle, consistent pressure
- Maintain tension throughout to avoid loose, sloppy rolls
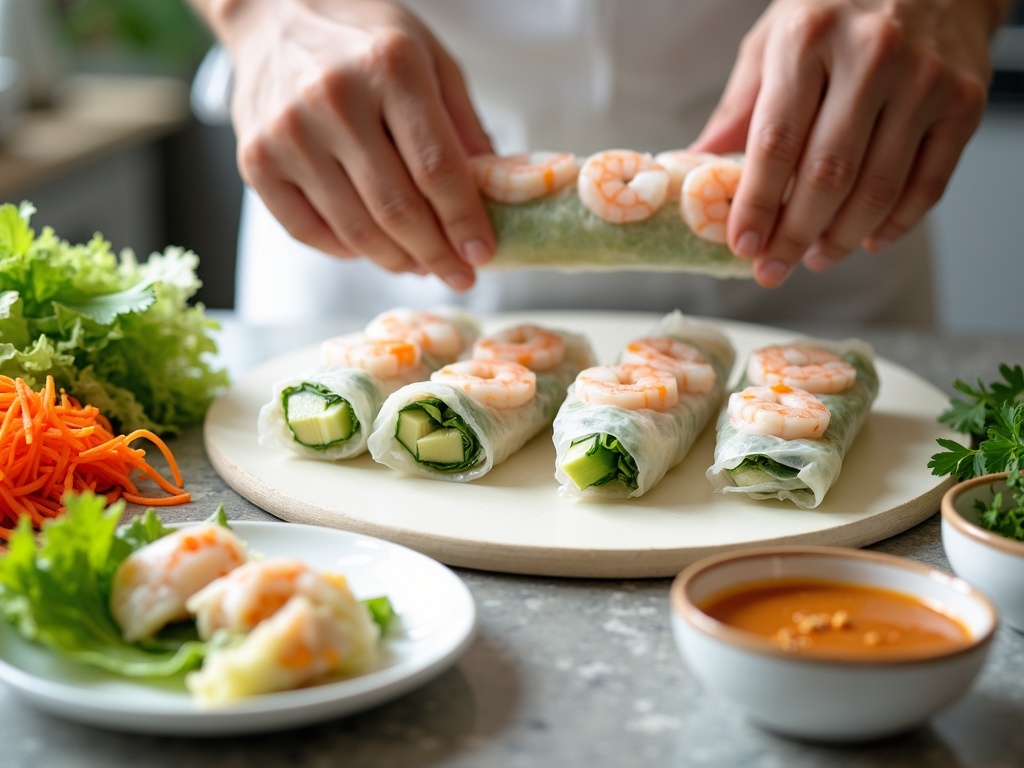
For an authentic Vietnamese presentation, I position shrimp halves so they show through the translucent wrapper, creating visual appeal that’s characteristic of restaurant-quality spring rolls. This technique requires placing the shrimp cut-side down against the wrapper before adding other ingredients.
I keep finished rolls at least half an inch apart on the serving plate to prevent sticking. This spacing allows air circulation and maintains the wrapper’s delicate texture.
Common problems have simple solutions:
- Tearing typically results from over-hydrating the wrapper—reduce soaking time to 15–20 seconds maximum.
- Loose rolls indicate insufficient tension during the initial tuck phase. Focus on creating that tight foundation before proceeding.
- Sticking occurs when rolls touch each other, so maintain proper spacing throughout the process.
Temperature control of the water makes a significant difference in wrapper flexibility. Water that’s too hot makes wrappers gummy, while cold water prevents proper hydration. I test with my finger to ensure the temperature feels comfortably warm.
Practice develops muscle memory for the rolling technique, and each attempt builds confidence. Start with simple fillings before progressing to more complex combinations. Once you master this fundamental skill, you’ll find endless possibilities for creative wrapper applications that extend far beyond traditional recipes.
Choosing the Right Wrapper and Ingredients
I always recommend starting with the wrapper selection since this foundation determines your entire spring roll experience. Rice paper wrappers, known as Bánh Tráng in Vietnamese cuisine, work perfectly for fresh summer rolls called Gỏi Cuốn. These translucent, rice-based wrappers contain approximately 30-35 calories per 22cm wrapper and offer a gluten-free option that becomes pliable when moistened. For fried spring rolls or Chun Juan, wheat flour wrappers deliver the crispy texture you’re after. These pre-made skins require no rehydration and contain about 50-60 calories each, turning golden and crispy when cooked.
Creating the Perfect Filling Balance
I maintain a filling ratio of 2 parts vegetables to 1 part protein to 1 part noodles or starch for optimal taste and texture. This proportion ensures your rolls won’t become soggy or fall apart during assembly. Using spring roll wrappers effectively requires understanding this balance.
When preparing vegetables, I cut everything into uniform matchsticks about 2-3 inches long using the julienne technique. Here’s what I include in my classic spring roll preparation:
- Fresh lettuce leaves for crunch and freshness
- Julienned carrots for sweetness and color
- Cucumber matchsticks for cool texture
- Bean sprouts for additional crunch
- Fresh herbs like mint, cilantro, and Thai basil
- Rice vermicelli noodles for substance
- Pre-cooked proteins such as shrimp, pork, chicken, or tofu
I always ensure proteins reach their proper internal temperature before cooling – shrimp should hit 145°F (62°C) for food safety. Pre-cooking and cooling proteins prevents the wrapper from becoming soggy and makes rolling spring rolls much easier.
Rice vermicelli noodles need proper preparation too. I soak them in warm water until tender, then drain completely before use. Excess moisture will tear your wrappers and create messy rolls. Fresh herbs should be washed, dried thoroughly, and kept whole rather than chopped to maintain their aromatic oils.
Temperature control plays a crucial role in assembly. I keep all ingredients at room temperature or slightly cool, never hot, which prevents wrapper damage. This preparation method works whether you’re following a traditional spring roll recipe or experimenting with creative wrapper applications.
Quality matters significantly when selecting spring roll skins. I choose wrappers that feel smooth and show no cracks or tears. Fresh wrappers from Asian markets typically offer better results than aged packages from regular grocery stores.
Troubleshooting and Perfecting Your Technique
Even experienced cooks encounter challenges when rolling spring rolls. I’ve seen countless home cooks struggle with torn wrappers, loose rolls, and overstuffed disasters. Understanding these common issues and their solutions will transform your spring roll game from frustrating to flawless.
Fixing Torn Rice Paper and Wrapper Problems
Torn rice paper ranks as the most frequent complaint I hear from beginners. If your wrapper keeps tearing, I recommend reducing your soaking time to just 15–20 seconds. Many people oversoak, making the wrapper too fragile to handle. Check that your vegetables have smooth edges too—sharp carrot julienne or rough lettuce tears can puncture delicate rice paper.
When tearing persists despite shorter soaking times, reduce your filling by 20%. Overstuffing puts excessive pressure on the wrapper during rolling. For particularly stubborn situations, try double-wrapping by placing your filled roll on a second soaked wrapper and rolling again. This technique creates extra insurance against tears while maintaining flexibility.
Preventing Loose Rolls and Sticking Issues
Loose spring rolls stem from insufficient filling or poor rolling technique. I ensure my initial tuck stays tight by folding the wrapper firmly over the filling before beginning the roll. You need more than 2–3 tablespoons of filling to create proper tension within the wrapper. Too little filling leaves empty space that prevents the wrapper from holding its shape.
Sticking presents another common challenge, especially when making multiple rolls. Keep finished rolls at least 1/2 inch apart on your serving plate. For better separation, wrap each roll individually in plastic wrap or place them on lettuce leaves. This prevents the sticky rice paper from bonding together and ruining your presentation.
I can’t stress enough how overstuffing sabotages even the most careful technique. Less filling always creates a tighter, more manageable roll. Your spring roll recipe should include precise measurements, but trust your judgment when assembling. If the filling looks like it might burst the wrapper, remove some ingredients.
Water management plays a crucial role in successful rolling. Too much moisture on ingredients makes wrappers soggy and impossible to handle. Drain your noodles thoroughly after cooking and pat vegetables dry with paper towels. Excess water creates a slippery mess that compromises both texture and rollability.
Professional kitchens solve transport and storage challenges by wrapping each roll individually in plastic wrap. This method prevents sticking, maintains freshness, and allows for easy serving. When using spring roll wrappers properly, your finished products should stay fresh for several hours when wrapped this way.
Temperature affects wrapper behavior significantly. Cold wrappers become brittle and tear easily, while overly warm ones turn mushy. I work with wrappers at room temperature and replace my soaking water if it becomes too warm. This simple adjustment prevents many common problems before they start.
Practice creates muscle memory that eliminates most rolling issues. Start with simple wrapper techniques before attempting complex fillings. Master the basic fold-and-roll motion with minimal ingredients, then gradually increase complexity as your confidence grows.
Remember that imperfect rolls still taste delicious. I’ve served countless “ugly” spring rolls that received rave reviews. Focus on flavor combinations and proper ingredient preparation rather than achieving perfect visual presentation. Your technique will improve naturally with repetition, but great taste comes from quality ingredients and balanced flavors.
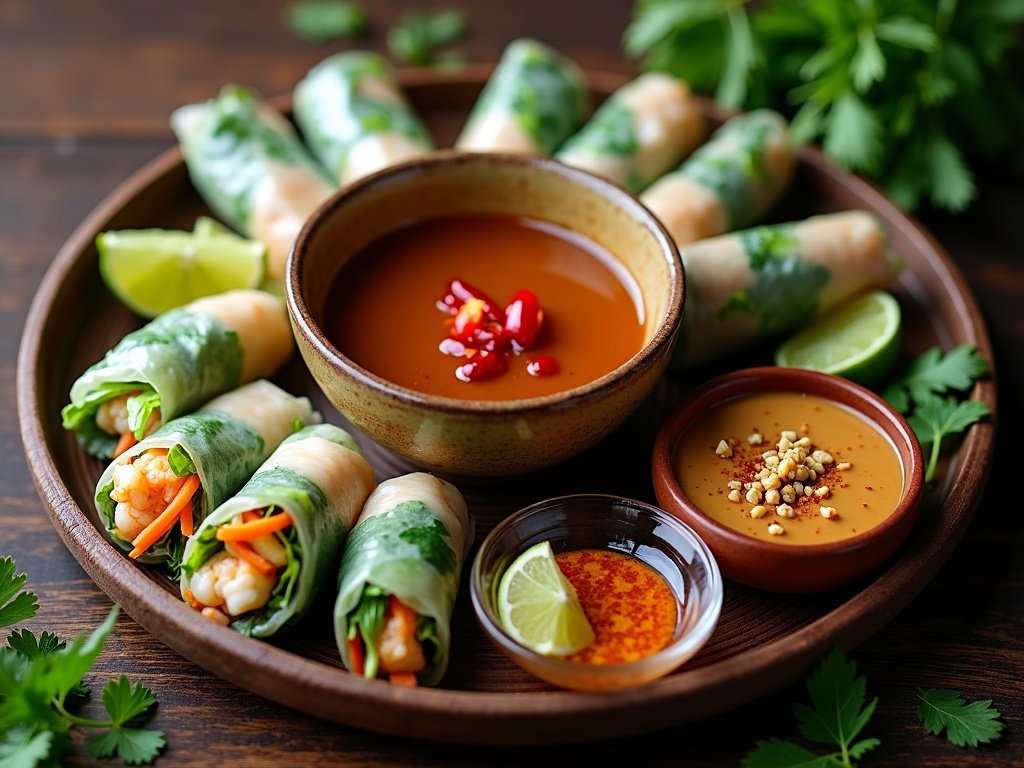
Essential Dipping Sauces to Complete Your Spring Rolls
Dipping sauces transform every bite of your freshly rolled spring roll into a flavor explosion. I’ve discovered that the sauce carries just as much importance as the roll itself for creating that complete, authentic taste experience. Each sauce brings its own personality to the table, complementing different fillings and satisfying various flavor preferences.
Traditional Vietnamese Nuoc Cham
Nuoc Cham stands as the classic companion for Vietnamese spring rolls, delivering that perfect balance of tangy and savory notes. I prepare this sauce using a simple 1:1:1:4 ratio: one part fish sauce, one part sugar, one part fresh lime juice, and four parts warm water. The warm water helps dissolve the sugar completely, creating a smooth base that won’t crystallize.
Fresh garlic and chili elevate this sauce from good to extraordinary. I finely mince one clove of garlic and add thinly sliced bird’s eye chili to taste. The beauty of Nuoc Cham lies in its versatility – you can adjust the heat level and acidity based on your preferences. Some days I add extra lime juice for brightness, other times I increase the chili for more kick.
Rich Peanut Hoisin Sauce
Peanut sauce brings creamy richness that pairs beautifully with homemade spring rolls filled with fresh vegetables and herbs. I combine:
- Three parts smooth peanut butter
- Two parts hoisin sauce
- One part water or coconut milk
This ratio creates the perfect consistency that clings to your spring roll without being too thick.
A splash of soy sauce adds depth, while fresh lime juice brightens the entire mixture. I whisk these ingredients together until completely smooth, then taste and adjust. Sometimes I thin it with additional coconut milk for a silkier texture. The finishing touch involves garnishing with crushed roasted peanuts, which adds delightful texture contrast and amplifies the nutty flavor profile.
Homemade Sweet Chili Sauce
Sweet chili sauce offers another fantastic option, whether you choose store-bought varieties like Mae Ploy or craft your own version. For homemade sweet chili sauce, I use this basic formula:
- Half a cup of water
- Quarter cup of rice vinegar
- Quarter cup of sugar
- One tablespoon of sambal oelek (adjust to taste)
I bring this mixture to a gentle boil, then reduce the heat and simmer until the sugar dissolves completely. A cornstarch slurry — one teaspoon of cornstarch mixed with one tablespoon of cold water — thickens the sauce to the ideal consistency. The finished product should coat the back of a spoon but still pour easily.
Pairing Sauces with Spring Rolls
Each sauce serves different purposes and complements various spring roll preparations:
- Nuoc Cham cuts through rich, protein-heavy fillings while enhancing fresh herbs and vegetables.
- Peanut hoisin sauce works wonderfully with lighter, vegetable-forward rolls, adding richness without overwhelming delicate flavors.
- Sweet chili sauce bridges the gap, offering sweetness that balances spicy elements while providing enough acidity to refresh your palate.
I always prepare these sauces fresh when possible, though they store well in the refrigerator for several days. The flavors actually improve after sitting for a few hours, allowing all the components to meld together. When serving, I provide small individual bowls for each diner, ensuring everyone can enjoy their preferred sauce without cross-contamination.
Understanding how to use spring roll wrappers properly becomes even more rewarding when you pair your creations with these authentic sauces. The combination of perfectly wrapped rolls and carefully crafted dipping sauces creates an authentic dining experience that rivals any restaurant. Whether you’re exploring creative wrapper applications or sticking to traditional preparations, these sauces will elevate your spring roll game significantly.
Sources:
– The Art of the Perfect Spring Roll: A Step-by-Step Guide
– Choosing the Right Wrapper and Ingredients
– Troubleshooting and Perfecting Your Technique
– Essential Dipping Sauces to Complete Your Spring Rolls